Monday, 21 March 2011

Make Recycled Paper Briquettes - how to save money on firewood

There seems to be an endless stream of paper in the letterbox. It's great to recycle paper and cardboard, but if you have a wood burner, why give it away when it could be converted into free firewood?

For Christmas I was given a paper briquette maker. After deciphering the instructions, my son and I merrily started ripping and tearing newspaper and promptly turned it into sludge. Sometime later, arms covered in starch and paper glue, we proudly pressed out our first briquette. Several months later, we have a fair sized stack of briquettes drying for winter.

Let the kids earn their pocket money doing a job that will get them outside, squelching paper. It's a win:win for everyone. Here are some quick steps to get you started.


Add shredded paper from the office, cardboard, newspaper and other assorted bits and pieces of paper to water and let soak for a few hours. Note, cardboard will take longer to get suitably soggy.


When the paper is ready, set out the briquette maker. Place the base into the mould and set the arms flat on a firm base.


Start adding paper into the mould. I have found it best to place sheets first to set a framework to support all the other smaller bits that get added later. 


Continue to fill the mould with paper mulch.  


Set the paper, cardboard and shredded paper in layers. When full, place the press plate over the mould.


Raise the arms of the press and apply weight downwards on each side squeezing the water out of the briquette.


Once the water is pressed out, lift the press plate and raise the base from the mould.


A finished briquette fresh off the press.


Once finished, set out in the sun to dry. Afterwards, store in a well aerated position to finish curing. The briquettes will get progressively lighter in colour as they dry.

Sunday, 20 March 2011

How to make an Onion Rope - store cured onions for winter

The ancient art of stringing an Onion Rope looks difficult, but follow these simple instructions and you will find it easy. 


Onion mature in early to mid summer. The first sign being when the 'tops go down' -turn yellow and fold over. Approximately 2 to 4 weeks later, the tops will have dried sufficently to pull the bulbs from the bed. 

At this time the onion should be laid out in a single layer to cure - dry out. It doesn't matter if they get a small amount of rain on the bulbs, as this will help the onion skins cure. Excessive rain however can cause staining.

Once cured, strip the excess dry plant material from the bulbs.

These bulbs are 'longkeeper' and will last all winter in storage.

A great way of storing the bulbs for winter is to make an Onion Rope.

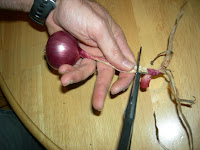
Each onion should have the top trimmed to leave a tail of about 10cm (4") long.


Start the Onion Rope by preparing a 'noose' at the end of a length of rope. The rope should be capable of supporting a weight of approximately 20kg (50lb).

Make sure the 'reef knot' can slip freely down the rope.


Next, select three (3) large onions and slip the tops through the noose.


Draw the noose tight around the tops. This becomes the base of the Onion Rope and supports all the other onions that are tied above it.


The onions are placed in a spiral around the rope.

Loop the onion top around the back of the rope.


Bring the top back around and over the onion neck.


Then draw the onion top beneath the onion (clockwise) and out the other side. Now pull downwards to tighten the knot.

The tension on the knot combined with the weight of the onion, holds the bulb in place.


Once the first few onions are secured, it is advisable to hang up the rope so that both hands are free to work. 

Continue to layer bulb after bulb in the same manner in a spiral or whorl around the string.

Pull the tops gently down the rope periodically to keep the rope compact. 


All types of onion; both brown and red, garlic and shallots can be strung in this way.

Here I have added a few red onion that I grew for salads.


Saturday, 19 March 2011

How to collect and save your own vegetable seeds

Saving your own seeds from a spectacular tomato or huge pumpkin that you grew can be fun. It is quite something to skite about to say, "it's my own variety". Not all vegetables are easy to collect seed from, a number are hybrids and require the original parents to reproduce the same plant. However, whilst the result may not be guaranteed, sometimes that is part of the fun too - you never quite know what's around the corner, perhaps it might be the new, improved version...

Tomato and pepper, are perhaps the easiest to keep seed from. Mature seed is darker in colour and will have a higher germination percentage and produce more vigorous plants next season.

These Heirloom Roma Tomato are very fleshy and were great on home-made pizza. I definitely want to keep seed for next year.


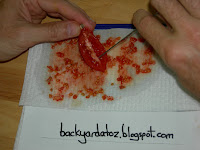
Take a knife and slice the fruit down the centre, prising the seed from the jelly. Leave behind the fleshy part of the fruit.

The seed should be spread out thinly over an absorbant paper and then placed in a warm dry space.

If you have room the linen cupboard is great...

Short Green Cucumber - also called American slicer types grow well in outdoor vegetable gardens.

This cucumber plant battled through the hot summer without too much powdery mildew. I'll give it another go next season.


Once the leaves have died off and the stalks are dry, pumpkin can be harvested.

This self-set 'Crown' pumpkin grew with little to no care and has produced some nice fruit.


There are plenty of seed to dry for next year.

Once the seed is removed from the centre, clean away as much of the 'flesh' as possible and store in a dry place. Pumpkin are a large seed and will take longer than smaller seed like tomato to dry.

When dry, place in an air-tight jar and store in a cool location until spring.

Celery can be open pollinated or hybrid. My celery went to seed early this summmer as a result of the hot dry conditions. Rather than pull them out I decided to leave in place and let the seed mature.


Once the seed heads had turned brown I cut the seed stalks from the plant and placed in a paper bag to dry.

After the seed had dried, shake the seed from the seed heads onto a paper towl and then store in an air-tight jar.


My parents saved these seed from their parsnip plants. The process was similar as per the celery above.


Saving and swapping seed is a great way to both retain your favourite fruits and vegetables from one season to the next and also to save money. If you swap with friends or relatives, then it's both cost effective and adds a bit of competition - see who can grow the best one!

Good Growing.


Seed Bed planting - How to plant lettuce, brocolli, cabbage and cauliflower for winter

It's approaching autumn, the days are still hot, but the nights are cooler. Now is the time to plant your winter vegies. The Brassica family; which includes my favourites such as brocolli and cauliflower, are ideally planted now. Brussel Sprouts are better suited to cooler climes, so unfortunately I miss out on that count. Head lettuce (Iceberg) also perform really well, now that the intense heat of summer is over.

Last week I prepared the seed bed and left fallow to settle. This weekend with the help of my son, we'll plant up a few seedlings that we grew ourselves and some we bought from the garden centre.

Brassica are the main vegetables for this particular bed. Last year I planted onion here and fortunately I knew the previous owner had planted potato the year before. This is a good rotation, because it  hasn't repeated the same family of vegetable. The benefit of the rotation is, any root disease that may favour one particular type of vegetable, won't be able to build up year after year.

The main brassica root disease to be wary of is 'Club Root'. Try to never plant brassica in the same soil more than once in three years, better still is one in four - but on small plots it is difficult. If your soil is free of the disease, then the main risk to bring it in to your plot, is through dirty footware (you visited someone else's plot who does have it) or through infected transplants. Always check your transplants before planting out. If the plant appears wilted and sick, and the root system has a 'knotted ball or gall-like root' - place the transplant in a plastic bag and dispose of in the household waste. DO NOT put it in your compost. If you purchased the plant, then take it back immediately and complain. Once in your plot, it's there forever!


Brassica love lime. Add either Lime or Dolomite to your brassica seed bed. Here I have added 1 cup (approximately 350g) per metre of bed. 


Lightly work the lime into the top few centimetres (1") of soil. This will ensure the young seedlings have optimum soil pH at planting.

Rain will wash the lime down through the bed over time, which will match the growth of the roots as they develop.


When removing the seedlings from their pots or tray, always use a dibber. I prefer to use ice block sticks, as they are thin and both flexible and yet won't break.


Before planting out, space the seedlings at the desired distance down the bed.  Use a string line to mark a neat row. Brassica should be planted at approximately 450mm (18") apart, with lettuce or spinach at 300mm (12") spacing.


This is a great time to get the kids into the garden.

The theory goes, "If they planted it, they are more likely to eat it"... Hmm.., well at least the fresh air does them good.


Planting is fairly straight forward. Dig a hole to match the size of the root ball of the seedling. Too deep and the plant will be 'buried' and too shallow and the roots will be exposed.


When planting, gently place the seedling into the hole, supporting the top of the plant in one hand and fold the soil in around the roots. Lightly compress the soil around the plant to hold the seedling firmly in place.

Do not crush or squash the root system down into the hole, as this will damage the roots and basal part of the stem.


The planted seedling should stand upright, support itself freely and be at a depth where the original media - potting mix, can just be visible.


Once planting is complete, place cut-off bottles such as plastic milk containers around each plant as protection against slugs and snails. The shield will also give some wind protection. Excess rocking backwards and forwards by wind, can cause fine cracks in the stem base and expose the seedlings to disease, which should be avoided where possible.

Next lightly water, using a garden hose set to a fine mist. You don't want to knock the new seedlings around with a coarse jet of water.

The last step is to label each variety, so that you will remember what is where.


We will follow these brassica and greens - lettuce and silverbeet, through their growth stages this autumn/ winter and address their growing needs as they arise.

Now is a good time to start saving your egg shells from the kitchen. When the plants are a little taller, we will remove the plastic guards and spread broken egg shells and other protectants such as Coconut chips (Coir-fibre chips) over the bed, to reduce the presence of slugs and snails.

Good growing.


Thursday, 17 March 2011

DIY fun with the kids - Build a Seed Tray & then paint it

Here's a simple DIY project that the kids can help with. Rather than buying a seed tray; with a few tools, some short lengths of timber (here I have recycled an old broken pallet) and a spare hour or so, you can have some family time, building a wooden seed tray. Afterwards, if you want to add to the fun, let the kids paint their seed tray in their choice of colours and design. When complete, they can plant seeds of their favourite vegies in it.

A few weeks later, they will have achieved two successes in one, a building project and grown some new young plants.

The image here shows the tools required to build this wooden seed tray.


If you are recycling old timber, in this case a broken pallet, it is first necessary to dismantle the pallet and remove the nails.

Carefully slide a wide mouth wood chisel under the board and prise upwards. Be sure to avoid the nails or you will damage the chisel edge.


Once the board is loosened slightly, take a claw hammer and drag the nail head as far into the claw as possible.

To increase the power of the claw, wedge a small piece wood between the board and the claw hammer. This will act as a fulcrum and increase the leverage action, lifting the nail much easier.


Now that you have your selection of boards and planks, it is time to start to prepare the pieces for the seed tray. The Seed Tray has the dimensions 300mm (12") x 450mm (18") x 50mm (2").


First select the piece of wood to be used for the two ends. This should be thicker than the base, preferably 25mm (1") thick. My timber from the pallet was too thick, so I rip sawed a board in two, producing two narrower end pieces. If you have two pieces of 50mm x 25mm (2"x1") then cut to 300mm (12") long. Use a set square for straight edges and a hint for the young ones; always make the cuts on the outside edge of their marked lines. This will allow them to watch the line as they saw through their piece of wood and it will be the same for both pieces - a matching pair.


The timber that I recycled from my pallet was rough sawn. To create smooth surfaces, use a wood plane and then sand the edges. A trick when using a wood plane, is always plane with the 'grain' and set the depth of the blade shallow.

If it isn't immediately obvious; one way the wood plane will glide smoothly across the timber, the other will likely bite into the wood and take chunks out of it. If the going is a little tough; I keep the plane level, but slide it at a slight angle so that the cutting blade gradually starts to shave the surface. 

Once it is shaving smoothly, square up the plane and finish the stroke.


The base timber should be 450mm (18") long and ideally 6mm (1/4") to 12.5mm (1/2") thick. If it is any thicker, it will be too heavy when planted out.  When setting out, the base timber should be 300mm wide. This can be made up of two to four 'slats'. Leave a slight gap, say 1mm between each piece, for drainage. If the wood is fresh from the hardware shop, then it is likely to shrink with age and it is best to butt each board up tighter.

The last pieces to cut to length are the side walls of the tray.

These run between the two end pieces and if using recycled timber may not be exactly the same. Set in place, mark, and then cut to length.

Assemble the top of the tray first.


Pre-drill all the screw holes for ease of assembly.

Follow safety precautions and always wear eye protection when using power tools such as electric drills.

Once the holes are drilled, use a 'countersink drill bit' to ensure that the screw head will be recessed into the timber.

This avoids catching your hands on the top of exposed screw heads. If you don't have the special drill bit, use a large bit (say 6mm -1/4") and carefully drill a few mm deep over each hole.

When complete, screw in place. Preferably use galvanised screws as the tray will be exposed to the elements outside.

When the top of the tray is complete, turn it over and screw on the base. I haven't used glue on any of the joints, but you could if you wanted.


This tray is complete, but unpainted.


In the next blog we will plant the seed tray - it will give you time to let the paint dry.


Monday, 14 March 2011

Planting Vegetables - Seed-bed Preparation

Preparing a good seed-bed is the first part of growing a succesful vegetable garden. My backyard has previously been used for growing vegetables which has both benefits and some negatives. The benefit of inheriting a plot previously worked, is that the job of digging may be easier, which on a hot summer's day is a bit of a blessing.

The negatives are; you have no idea of what was grown where. This is important because of what is called 'the rotation' and comes from the desire to not grow the same type of vegetable in the same location, year after year. Rotation is critical to minimise the risk of soil diseases which can build up over time, particularly important if you are like me and you don't want to spray your vegetables with chemicals. 

If your plot has never been cropped before, start by chipping away the top layer of grass and weeds down to the soil surface. Skim the face of the blade over the soil, trying not to dig more than a few centimetres deep separating the sward (top) from the roots. This will leave the majority of the topsoil intact. Lift this part of the sod to one side of the bed. If you have a compost heap, this can be incorporated into the mound. If not, then dig a full spade depth deep and then bury this plant material to rot.

Once the soil surface is clear of weeds, dig to a full spade depth and invert the divet. This will aerate the soil and loosen up the soil structure, breaking up compacted layers that may have formed from factors such as foot-traffic or heavy winter rain.  

Break up the larger clods of soil with your spade or garden fork until a 'crumbly' structure is achieved. If seeds are to be sown, the soil texture in the upper layer needs to be very fine - perferably the particles should not be larger than 1mm - 3mm in size, as small seeds require close contact with the soil. If the structure is too coarse, then the germination of the seed may be affected.
Where transplants are to be grown then the seedbed can be more forgiving, however a consistent even tilth is still desirable.

Once the seed-bed has been dug-over, it is time to add soil ammendments such as compost. The nutrient rich, semi-digested organic matter, will act both as a plant fertiliser and enhance the activity of soil microbes which benefit plant growth.

     
Incorporate the compost to the full spade depth. This will improve drainage within the seed-bed and offer extended nutrient supply for the full growing period as the root systems of mature plants reach the bottom of the soil profile.

In addition to compost, lime or dolomite can be added to help raise the soil pH. Lime adds calcium and Dolomite adds both calcium and magnesium.

Raising soil pH is important for vegetables such as brassicas which includes broccoli, cabbage and cauliflower. Higher pH can reduce the risk of soil diseases called 'club root' that specifically affect brassica.

Increasing soil calcium levels is also beneficial to other veges. It can improve quality and shelf-life of lettuce and reduce the risk disorders such as blossom-end-rot of tomato and capsicum. We will cover all of these in later blogs as we progress through the growing season.

Seed-bed ready for planting